Pages

Thursday, July 29, 2010

Tip #5: More on Combining Blocks

As promised, here is some inside information on how BlockFab combines blocks for displaying sample quilt layouts.

In quilting, blocks can be combined in countless ways, many of them quite innovative and complex. Judy Martin's star block combinations are some of my favorites.

However, BlockFab keeps the combinations simple. Any block can be used for the inside part of the combination. But the best candidates for the outside block are ones with a largish square patch in the center, and this is the guideline used by BlockFab. In particular, BlockFab looks for a single square -- presumably at or near the center -- that is at least half the width of the block. This means the block must have at least a grid size of 4.

For example, a regular Nine-Patch block (grid size 3) meets the center square criteria, but it fails the size test (it is only 1/3 the width of the block). On the other hand, the Uneven Ninepatch block (grid size 4), has a single center square that extends half the width of the block. Thus the former is not a combination block, but the latter is.

Currently in the library, only 8 blocks fit this selection criteria for the outside part of a block combination. They are Anvil, both Churn Dash Frame blocks, King's Crown, Spool, Square in a Square, Uneven Ninepatch, and Variable Star.


The Square in a Square block makes an interesting combination block because it gives the illusion that the quilt is set on point, even when it isn't!

I'm always looking for some good blocks to add to the BlockFab Library. Do you have any good candidates for combination blocks that meet these criteria?

Monday, July 26, 2010

BOW #8: Friendship Star


Friendship Star is one of my favorite blocks.  (I seem to have a lot of favorites, don't I?)  In the Icon Quilt the star is one of the combination blocks, inside a Variable Star.

The block is simple and it's somehow .... a happy block.   All you need are squares and those ubiquitous Half Square Triangles.    For a 9" block, for example, you'll need:

4 light squares, 3-1/2"
1 dark square, 3-1/2"
4 Half Square Triangle Units (half light and half dark), 3-1/2"
   (So, to make those HSTs you will cut 3-7/8" squares, cut in half diagonally)
Because I am such a fan of the Friendship Star I have made several quilts; here are a few of them.  (I have given most of them away, and don't have photos of all of them.  That's not good.  I must do better about taking photos and documenting.  Note to self...)

One of my designs from Cabin Star Designs days:
This is a raffle quilt, in progress.  There are three different sizes of Friendship Star in this one.

And this one was hanging on the wall where I do longarm quilting; it's a bit of a variation:


Have fun with the Friendship Star--and send us your photos for our gallery!

Another Bear Paw Quilt

As I was going through quilt photos I found this blue Bear Paw quilt--unquilted.  It's still unquilted.  I won't tell you how long this quilt has been sitting on the shelf, waiting to be quilted.

Sunday, July 25, 2010

Yet Another Variable Star Quilt

Here is another example of a quilt using a variable star, this time combined with other blocks. It's a miniature medallion quilt (27" x 27") with a Christmas theme, made as a progressive quilt for Quilt Nebraska 1999. Does anyone from Nebraska recognize their block?

The variable star nicely unifies the wide variety of star-center block choices. And the way they are lined up, they give the illusion of Square-in-a-Square blocks between them. Have you used this block in any other interesting ways?

Friday, July 23, 2010

Tip #4: Combining Blocks


I'm getting behind on my Tip postings! Since this week's block is the Variable Star -- one that combines particularly well with other blocks -- let's see how to use the Combine layout style in BlockFab.

First, go to the Library and select a block you would like to audition in the center of some other blocks. Then go to the Layout screen by following the blue arrow, either from the Block page or from the Library. Once a quilt layout using your chosen block is displayed, choose Combine from the bottom row of choices.


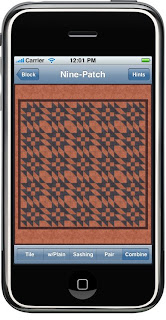
In the image on the left, I chose the Nine-Patch block, and it is first combined with the Anvil block.

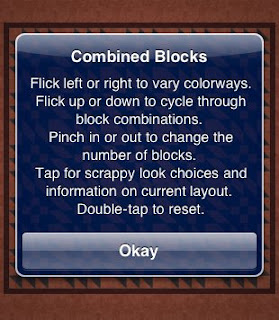
Don't forget to tap the Hints button in the upper right corner to see what you can do with this layout option, including cycle through the combinable blocks (flick up and down), change colorways (flick left or right), and increase or decrease number of blocks (pinch in or out). Tap once on the quilt to see what combination block is being used.


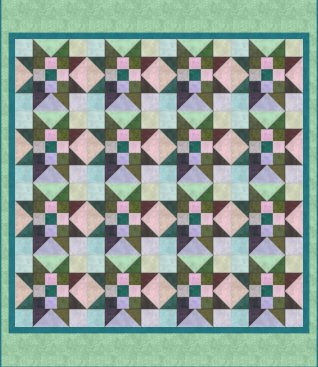
In this next layout, I've flicked up once to get the Variable Star outside block, flicked right a couple times to the Ocean colorway, pinched out once for bigger blocks, and tapped once to get to the Scrappy look. I can keep flicking, pinching, and tapping as long as I want, to see many, many looks.

In the next tip, I'll give you some inside information on what blocks can be combined and why.

Wednesday, July 21, 2010

Another Variable/Sawtooth Star

This quilt hangs in my kitchen.  I think it might have been one of the first quilts that I hand quilted.  I started loving the sawtooth star a long time ago!

Monday, July 19, 2010

BOW #7 Variable Star


Variable Star (which you might also know as Sawtooth Star--especially when the start points and center square are all the same fabric or color) is one of my favorite blocks, and you see four of them in the icon quilt.

The star is easy to make, using 4 geese units (see last week's post,  BOW # 6 ),  a large center square and 4 corner squares.
For a 12" finished star the unit sizes are:
  (4) geese units, 3-1/2" x 6-1/2"
  (1) 6-1/2" square
  (4) 3-1/2" squares

Arrange the pieces as shown below:


Now, the really FUN part of this star is that you can put whatever you want in the large center square--"fussy-cut" fun fabric, or another block that finishes at 6."  In the icon quilt there are 4 stars, each with a different block in the center:  a Nine Patch, a Friendship Star, a Churn Dash, and a pinwheel.

You'll see more about ho to make those blocks in an upcoming post.


(Doesn't the pinwheel inside the star look a lot like the LeMoyne Star?  Different color combinations and arrangements would be wonderful!)

As you're looking at quilts and blocks be looking for those that could fit inside another block such as the Variable Star.  I think that simpler blocks look best in the center of the star, but you could also put in some complex blocks if you're willing to do the math, and piece all those pieces!

Monday, July 12, 2010

BOW #6: Dutchman's Puzzle


Dutchman's Puzzle is a series of Flying Geese units, with pairs arranged in a pinwheel arrangement.  Traditionally it is a 3-color block:  2 main colors and a background but in the icon quilt I chose to use just 2 colors.

There are several ways to make Flying Geese units.  Most often I see quilters using the "square in the corner" method.  A single goose unit is twice as long as it is wide.  The example here will be for a goose unit that finishes at 3" x 6".

Cut:
1 rectangle 3-1/2" x 6-1/2" of the goose fabric (which will become the largest triangle)
2 squares 3-1/2" of the background fabric

On the wrong side of the squares draw a pencil line diagonally from corner to corner.
With right sides together, place a square on the left side of the rectangle, making sure the drawn line matches the orientation shown below:
Stitch along the drawn line.  Fold back the triangle created by the sewing in the previous step.  Press; trim the seam to approximately 1/4"

Place the other square on the right-hand side of the rectangle, making sure the drawn line is oriented as shown.
 
Sew along the line, fold back the triangle and press.  Trim the seam.
And you have a goose unit!


For the Dutchman's Puzzle you'll need 8 of these units, arranged and sewn as shown in the icon quilt block above.

One of my favorite ways to make Geese is to use the method shown by Eleanor Burns in this video on her website:

http://www.quiltinaday.com/television/video-flyinggeeseruler.asp

As with all quilt blocks, you can adapt it, change colors or arrangement.  Here's a quilt I designed for a class; the arrangement of the goose units in the block is essentially the same as Dutchman's Puzzle but, though it's a scrap quilt, the geese are all basically the same color--i.e., dark-ish brown.


So, have fun with the Flying Geese unit!  As with the half square triangle,  you'll find many blocks that include this unit.

Monday, July 5, 2010

BOW #5: Rail Fence

 
Rail Fence (Triple Rail, Triple Rail Fence) is one of the simplest of quilt block designs--great for a beginning quilter--but the secondary pattern it creates gives a Rail Fence quilt a lot of movement and interest.

I've often seen baby quilts in this pattern, as it sews up quickly (Why is that we often seem to be scrambling to make baby quilts at the last minute? ?) but is very charming--in any color scheme.

You could use light medium and dark of the same color, or various scraps in 3 colors, or a "planned" quilt with just 3 fabrics.  If you want to make it a little bigger choose one of the fabrics in the quilt (the one you like best), or choose a print fabric that has all the colors in it.  (It might be easier to choose the focus fabric/print that you like first, and then choose three fabrics to coordinate with it.)

Cutting and piecing couldn't be much simpler; for a 12" finished block:
  • Cut (4) 2-1/2" x 6-1/2" strips of each color.  
  • Sew 3 strips, each a different color, along te long edges to form a quarter of the block.  It will be 6-1/2" square.
  • Repeat to make 3 more quarter-blocks, making sure to arrange the fabrics in the same order as the first quarter.
  • Sew the quarters together, in the configuration shown below: 
  • The pattern and the name of this block call Abe Lincoln, the railsplitter, to mind for me.  I can picture a drawing in a biography of Lincoln, showing a split rail fence.  (I think Abe was leaning against the fence, axe abandoned beside him, reading a book.  That must be what appealed to my future-librarian's mind!)   The secondary pattern created by putting many blocks together looks like fences (albeit incredibly crooked ones) wandering over the landscape.

TIP #3: Ocean Waves Patches


The Ocean Waves block is a good example of how BlockFab can handle a block that is not in its library. The Patch feature has the answer.

There are a lot of ways to construct an Ocean Waves quilt block, but they all involve a large square (sometimes constructed as 4 quarter-square triangles) with 24 dark and 24 solid or light half square triangles. In my case, I want the center square to be 6" finished, making the half square triangles 2 1/8" on the short sides.

So, to calculate the dark fabric for a block, I use the Patch tab in BlockFab, choose Half Square Triangle from the library, and specify a finished size of 2 1/8" and a count of 24. I then email this information to myself, or take a snapshot of the screen. By checking the cutting assumptions screen, I see that I need one strip of fabric, and use 36" of my 40" -- not much waste there.


Now for the solid colored fabric. The same amount of fabric is needed for these 24 triangles as for the dark ones. hen, to calculate fabric for the central squares, I choose Square from the library, specify a 6" finished size, and give it a count of 1. But I can get more than 1 square from my 40" long strip. In fact, I can get 6 squares from a strip. (You can do the math yourself, or play around with the count and see how many you can get before the strip count goes to 2.) So I'll keep that in mind, and take it into account when I decide on how many blocks I want to make. Again I email the results or take a snapshot.

So, in all, I need 1/8 yard of dark fabric (or scraps) and 1/8 yard of light fabric per block, plus 1/4 yard light fabric per 6 blocks.

Of course, if someone would just add this block to the library, there would be no need to go through these extra steps! Maybe next update...