Pages

Monday, April 25, 2011

BOW #45 Square in a Square

This is actually a square in a square in a square and it's a great block for showcasing a photo on fabric, or a really beautiful piece of fabric.

For a 12" finished block you will need:
(1) 6-1/2" square for the center
(1) 7-1/2" square, cut twice diagonally (cut corner to corner, then without moving the pieces, cut it diagonally from corner to corner the other direction, with the cuts making an X in the square.
(2) 6-7/8" squares, cut once diagonally  (These will be the outside triangles)

Why are you cut one of the squares twice, and the others just once?  You want to try to have straight edges on the outside of a block, and when you cut just once diagonally the bias edge is along the long edge/hypotenuse and the straight edges on the other sides--just what we want to finish off the block, so there aren't any bias edges to worry about on the outer edges.

Arrange the pieces as below;  the triangles that came from the larger squares that were cut twice are sewn to each side of the center square.  Sew a triangle along one side, then a triangle on the opposite side.  Then do the other two sides.   Finally, sew the triangles that were cut from the 6-7/8" squares along the "new" square that you just created.


In the end, your block will look like:


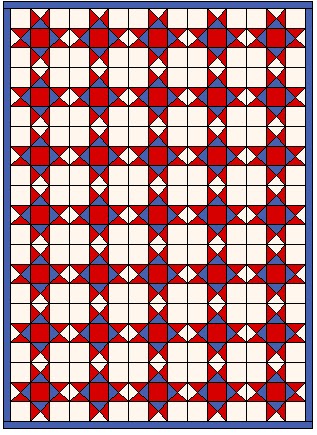
You can make a quilt that is made of just Square in a Square block.  I have done this quite a few times when I've made photo quilts, with photos as the center squares, and a scrappy look for the surrounding traingles.


You can also alternate the block with other 4-patch blocks, as with the Four Patch:

or a pinwheel:


The center square would also be a great place to showcase a large-scale print, such as a beautiful floral.

Monday, April 18, 2011

BOW #44: Split Ohio Star

This week we're going to revisit BOW #42, the Ohio Star, but this time we're going to split it diagonally and make a sort of positive/negative effect.

It is going to be made from mostly the same units, but in a little different configuration  For a 12" finished block you will need:

(1) 4-1/2" light square
(1) 4-1/2" dark square
(3) 4-1./2" light/dark HST (Half Square Triangle)
(4) 4-1/2" light/dark QST (Quarter Square Triangle; visit BOW #28 to learn how to make)
   (note that, unlike the Ohio Star in BOW #42, each QST is just two colors, not three, and all are the same,they're just turned differently on each diagonal side.)

Arrange the squares as shown, making sure there's a diagonal line with each half the positive (or negative, depending on how you look at it!) of the other:


This diagonal line makes layout of multiple blocks a lot of fun.  The first set here is a straight set, with blocks all laid out with the same orientation for all.  The second one takes advantage of the diagonal effect to create some secondary designs.  There are many other layout options; try playing with them!


On this layout, I've accented the diagonal effect by making two sides of the narrow border light, and the other two sides dark.


Monday, April 11, 2011

BOW #43 Goose in the Pond

Goose in the Pond looks like a complicated block, but the pieces are all simple, familiar pieces: half square triangles, squares, nine-patches, and rail fences.  It's on a 5 x 5 grid and the measurements for a 12" finished block are more than you want to deal with, so we're going to do a 15" finished block this week.

For a 15" finished block you will need:
(12)  3-1/2" Half Square Triangles, dark/light (Review BOW # for instructions on making HSTs)
(4)  light strips,  1-1/2" x 3-1/2"
(8) dark strips, 1-1/2" x 3-1/2"
(4) 3-1/2" nine patch units, using (5) light and (4) dark 1-1/2" squares

(5) light squares, 3-1/2"

First, use the light and dark 1-1/2" x 3-1/2" strips to create 4 Triple Rail units:


Than arrange all the units into the block, as shown.  You can do this one of several ways, but piecing row by row is probably the easiest.  Lay it out next to you at your sewing table, if possible, to make sure you're sewing it correctly.


You can sew many Goose in the Pond blocks in a straight-forward center.  This blue and white version reminds me of 18th century woven counterpanes, and I like that look but it also seems to lose the integrity of the block, which is a beauty, I think!  


Below is a quilt, from a Miss Rosie's pattern, that takes care of that problem by using sashing. (And you'll recognize Flying Geese in the border.)  This quilt adorns my bed during the holiday season.


(Truthfully,  I decided only this morning that it was time to retire it for the season.  It's hard for me to put it away, because I like it so much, but it will be something to look forward to next winter.)
This is a lovely block--enjoy it!

Monday, April 4, 2011

BOW #42 Ohio Star

Second of two blocks this week, since apparently I didn't publish Puss in the Corner last week!  (It was ready, and I could swear that I hit the publish button but, well, there you have it.)

This week's block is old, and often seen in quilts, the Ohio Star.  It makes use of the QST (Quarter Square Triangle) and squares, so we're visiting familiar shapes again.

If you want to review how to make Quarter Square Triangles (QSTs), visit BOW# 28 
 (You will start out with 5-1/2" squares, 2 reds and one each of blue and white. Square finished units up to 4-1/2")

You will need the following to make a 12" finished Ohio Start:
(1) 4-1/2" square red
(4) 4-1/2" squares white

(4) QST units that are half red/blue and half red/white:


Arrange units to form the block:


A quilt made of all Ohio Stars:


And one that alternates with plain blocks--which makes the star blocks more distinct:


And a few quilts that alternate with other blocks on a nine-patch grid:


This one almost has a curved look to it, doesn't it?


Do you recognize those alternate blocks, from earlier BOWs?  Which setting to you like best?  What other blocks might you pair with the Ohio Star?

BOW #41: Puss in the Corner

There are at least 2 blocks that are known as "Puss in the Corner."  The block we'll be making uses the other Puss in the Corner block, which is the Uneven Nine-Patch, but that is the center of this week's block.

The block is a 64-patch, or based on a grid of 8 x 8.  There are several ways you could put it together--from 64 individual 1-1/2" squares (not very efficient!) to uneven rows....but we're going to build it from the center out.

For this 12" block you will need:
(1) 3-1/2" square green
(12) 2" squares green
(12) 2" x 3-1/2" retangles red
(4) 2" x 3-1/2" rectangles background
(4) 2" x 6-1/2"" rectangles background

1) Working from the center out, we'll make an uneven nine-patch, using the 3-1/2" green square, 4 red 2" x 3-1/2" rectangles, and 4 green 2" squares:


To review:
a) sew red rectangles on opposite sides of the green center
b) sew green squares on ends of 2 remaining red rectangles
c) sew strips with green squares on the ends to the remaining sides of the large green square

(This is sometimes known as "Puss in the Corner" on its own.)


2) Then you'll make another round around this center, this time using 4 more green 2" squares, and 4 background 2" x 6-1/2" rectangles.  Again, sew background rectangles on opposite sides of the center block, add green squares on the ends of the other background rectangles, and sew those new strips to the remaining sides of the center block.


This is beginning to build what is called a "chain"--those green squares forming a diagonal line of green.


3) For the final round, first do the following piecing:
a) sew a red rectangle on opposite ends of the 2" x 3-1/2" rectangles, to make 4 long strips
b) on two of the strips from above, sew 2" green squares on opposite ends

4) Sew a strip from step 3a  to opposite ends of the block from Step 2:


5) Finally, add the last 2 strips, from step 3b, to the other two sides of the block.


The squares in the corners are also known as cornerstones, especially when you use them when putting borders onto quilts.   If using cornerstones when putting on borders, you would piece them the same way:  sewing a strip on opposite sides of the quilt top, then sewing the cornerstones on two other strips and sewing them on the remaining sides.

But I digress...
Here are a couple settings of this block.    First, a straight setting:


This has a certain charm.  Take a look at it from a distance...


Here's a second choice, this time with the blocks set on point.  This setting allows several choices for alternating plain blocks--different colors, maybe even a nice print in the "plain" (unpieced) blocks in the center.  I like this setting the best, I think.