Pages

Sunday, July 31, 2011

Drunkard's Path

Here is a quilt I'm working on that includes today's basic unit, the Drunkard's Path. I was aiming for a Card Tricks look, but it ended up looking like PacMan!
The iPad version of BlockFab (BlockFab-HD), includes some patches and blocks with curves. The two basic curved patches included are the pie and the crust, names often associated with the two pieces used in the Drunkard's Path block and its variants. For those of you who haven't dealt with curves before, we'll spend some time helping you to master this technique.


When placed next to each other, the two pieces of the Drunkard's Path block don't look like they'll fit together. Never fear: that's the nature of arcs and curves, and once they are sewn together, they will fit perfectly!


After cutting out the shapes, fold the pieces in half along the curved edges and mark the midpoint of each curve. You can use a pin, a marking pencil, or a tiny notch. These marks will be used to match up the center points of the curves.


The key to success is pinning the pieces properly. The straight edges at the ends of the curves of the two pieces should align exactly. So first lay the crust piece on the pie piece, right sides together, with the straight edges aligned as shown. Pin the pieces, with the pin parallel to the straight edges. This will keep them properly aligned while sewing.


Next, swing the curve on the top piece (the crust) around and align the straight edges at the other end of the curves and pin as on the first side. You should now be able to match up the midpoints that you previously marked, aligning the edges and inserting the pin perpendicular to the edge, as shown below.


Depending on the size of your pieces, you may want to insert 2 or 4 more pins. Be sure the curved edges of the fabric are lined up where you pin. The fabric between the pins will be eased in as you sew. Now sew your 1/4" seam allowance. Go slowly, and remove the pins as you approach them and ease in the fabric as needed. (The line where you sew will match up exactly with the bottom piece, but the top seam allowance will fan out just a bit.)


When finished, the seam can be pressed to either side, depending on which fabric is darker, or which way the seams on adjacent blocks lie.


With practice, you may want to try it without pins! Check out this YouTube video to see a video of how one quilter accomplishes this. Myself, I'll stick with my pins!

Now that you have the basic unit down pat, we'll  soon be looking at some of the larger standard blocks based on this unit. If you'd like to have a reference book, Pepper Cory's "65 Drunkard's Path Quilt Designs"  (you can purchase it at Dover) has many variations and alternate construction methods.

Sunday, July 10, 2011

Carpenter's Frame


We have now completed the first year of Block of the Week, covering all the blocks in the original iPhone/iPod Touch version of BlockFab. If you've kept up, and made a sampler with all or with a subset of the blocks, send us a photo -- we'd all love to see it!

Meanwhile, the later iPad version of BlockFab (BlockFab-HD), which came out last November, added some more blocks. By now, you can probably figure out a lot of them on your own, but some warrant a little more explanation. In particular, one of our readers has requested some details on the Carpenter's Frame block.


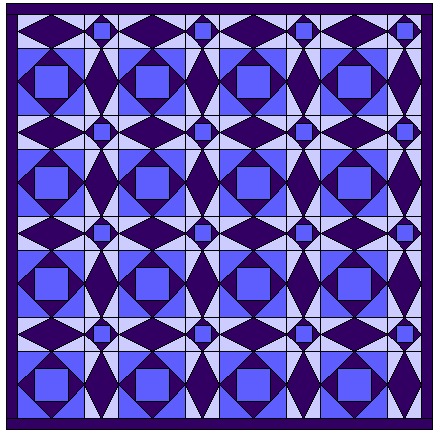
The Carpenter's Frame block is really a variation/simplification of the Carpenter's Wheel block. With its large open center, the frame variation works very nicely for designing your own combination block. If you put a LeMoyne Star in the center, it becomes the traditional Carpenter's Wheel block.

Although there are a lot of pieces, there are only two basic units: the Square, and the Half Square Triangle (HST).

For a 16" block, you'll need 2 colors plus a background color. If you are going to put your own 8" block in the center, you can skip the 8 1/2" center background square.

Cut:
(12) 2-7/8" squares Color 1 (for HSTs)
(12) 2-7/8" squares Color 2 (for HSTs)
(12) 2-7/8" squares Background (for HSTs)
(12) 2-1/2" squares Background
 (1) 8-1/2" square Background (for center of block)

On the wrong side of the Background  2-7/8" squares and the squares of Color 1, draw a diagonal line from corner to a corner with a pencil.

With right sides together, pair the following 2-7/8" squares:
(6) Color 1 and Color 2
(6) Color 1 and Background
(6) Color 2 and Background

Sew a scant 1/4" seam on both sides of the drawn diagonal line of each pair of squares.  Cut on the drawn line, fold back the darker of the fabric triangles and press open to make a square.

Alternatively, you can make the half-square triangle units using your favorite method, perhaps one of the methods mentioned in the BOW #1 post for the Bear's Paw.

At this point, you can lay out the squares, using the finished block as a guide for placement.  Alternatively, you can join the squares into larger units as follows, and then join these larger units like an uneven nine-patch, as described below.

Make four each of sub-unit 1 and sub-unit 2.  Carefully follow the colors layout and orientation.


Once you have the sub-units made, arrange them as shown:


I've always loved the look of the Carpenters Wheel, but been daunted by all those points coming together. I'm finally working on a quilt with some of these blocks, using Cindy Blackberg's stamps, and hand piecing.  It works great. But this version of the Carpenter's Frame block eliminates a lot of those y-seams and joining points.

This block does make a lot of interesting combinations.  Try it out on your iPad in BlockFab-HD with the Combination Layout feature using the Slideshow.  I'm working on making a video of such a slideshow, and I'll post it here.


Tuesday, June 28, 2011

BOW #52: Log Cabin

Bear's Paw is the first block I made and my favorite, but the block featured in this last of our series is a close second.  Log Cabin is one of the best-loved and most versatile blocks in quilting.

The Log Cabin is sometimes taught using a sew and whack method but I find that it's harder to be accurate that way, and can be frustrating for both new and experienced quilters.  It seems to work better for me if I cut the pieces ahead of time and, as I'm sewing them together, they keep me in line--and the block square.

For a 12" finished block, you will need:
(1) 3-/12" square  (Traditionally this is red, to symbolize the hearth in the log cabin, but--whatever!)
(1) 2" x 3-1/2" rectangle dark
(2) 2" x 5" rectangles light
(2) 2" x 6-1/2" rectangles dark
(2) 2" x 8" rectangles light
(2) 2" x 9-12" rectangles dark
(2) 2" x 11" light rectangles
(1) 2" x 12-1/2" rectangle dark

You are going to sew each of the 2" strips, in a counter-clockwise direction, around the center square, with two adjacent sides dark, and the the other two adjacent sides light.

Start by sewing the 2" x 3-1/2" strip to the top of the center square.  then, sew a 2" x 5" light rectangle on the left side the square,  and a 2" x 5" rectangle at the bottom.  For the end of the first round, sew a dark 2" x 6-1/2" rectangle on the right side.


Continue around, clockwise, adding increasingly rectangles and making sure that you keep lights on one side, and darks on the other.
You can change the size of the block by changing the size of the center (and adjusting the lengths of the rectangles accordingly), or by adding more rounds, or making the rectangles more narrow.

Now the fun begins because there are a great many ways you can set log cabin blocks, creating very different looks by simply rotating blocks.  Here are a few possibilities:


And here are a couple of my quilts--none of them finished yet.  Sigh.


This one has upper and lower borders of log cabin blocks.  (Sorry about the pins--I'm still quilting it.)


This one combines Friendship Star and Log Cabin--a design of mine called "Stars Over the Cabin."  (Yes, still quilting this one, too.)

b


There is another variation of the Log Cabin called Courthouse Steps.  In this variation, you still do dark and light, but darks are on opposite, rather than adjacent, sides.  (And the same for lights, then, too.)


So, play with Log Cabin, have fun with it--and share the results with us!

Tuesday, June 21, 2011

BOW #51 Flying Geese

This week we're revisiting a block--sort of.  We haven't talked specifically about just Flying Geese, but we have used a Flying Geese unit in quite a few blocks, starting with BOW #6,  Dutchman's Puzzle.  (Visit that post to review a couple of choices for constructing a Flying Geese unit.)

Flying Geese blocks come in various orientations and sizes and combinations.  A block might contain one or two or three or more units and they may be placed straight on, opposite, or diagonally.


A Flying Geese unit is one of the very basic units in quilting, because you can use it as building block in many other blocks:  the Variable Star, Weathervane, and more.   When you see a quilt block try breaking it down into smaller units:  squares, triangles (our old friends, the HST Half Square Triangle and QST Quarter Square Triangle), and the Flying Geese unit.  You can fill years of your life making quilts from blocks that contain just those basic shapes.


The FG unit may or may not be obvious in the block, but if you start breaking down blocks into units when you look at a block, you'll soon start to see them everywhere in blocks.   Can you find where, in these blocks, you could use FG units?


Here are a couple of quilts at my house that contain Flying Geese units:   the first is made with just the FG units, in the blocks (with pairs set in a sort of pinwheel fashion) and in the border that has the geese flying around and around the quilt.   The second quilt is one of my first quilts (hence the faded fabric--the dye in the early calicoes wasn't that fast, and it has spent some time in sunlight), and the FG units are turned into pine tree tops.


Wednesday, June 8, 2011

BOW #50 Spool

This week we have a chance to re-visit a pattern we've (sort of) visited before:  Spool. When we looked at it in BOW #25   we put four 6" spools together, with a bit of a spin.   This time it's one spool, in a 12" finished size. 

You will need:
(4) 3-/2" light/dark HSTs (Half Square Triangles)
(2) 3-1/2" x 6-1/2" light rectangles
(2) 3-1/2" x 6-1/2" dark rectangles
(1) 6-1/2" dark square


So, the only difference from BOW #25 is the size of the pieces and the finished block, but it makes a fine block all on its own--and could any block be more perfect for a quilter?

Early on in the series you saw how you can nest smaller blocks in larger blocks, swapping out plain squares for the pieced small blocks; this is a perfect block for that.  You could make an entire "sampler" quilt with the same spool block, but with a different 6" block in the center of each.

And wouldn't it be fun to do a spool-in-a-spool, with a 6" spool in the center of a 12" spool?

I pulled out a small quilt top to take a photo of the spool block (spinning spool, to be precise) and decided it might be fun to share the entire top:  there will be a couple of blocks that should look familiar to you, some that won't be familiar, and one that will be the featured block in the last of the BOW series.   With all the units and blocks you've pieced in this series you can probably figure out how to put together one or two of these blocks that we haven't talked about!

Tuesday, May 31, 2011

BOW #49 Storm at Sea

Storm at Sea has many pieces, but it creates a very nice effect when combined with other Storm blocks.

For a 12" finished block you'll need:

(4) 1:1 isosceles triangles, Dark
(1) 5-1/2" Dark square, cut twice diagonally (Quarter Square Triangles)
(1) 3-1/4" Dark square, cut twice diagonally (Quarter Square Triangles)
(4)  2-3/4" x 5-3/8" Light rectangles, cut diagonally once
(1) 4-1/2" Medium square
(1) 2-1/2" Medium square
(2) 4-7/8" squares Medium, cut once diagonally (Half Square Triangles)
(2) 2-7/8" squares Light, cut once diagonally (Half Square Triangles)

You'll make 1 each of 2 sizes of Square In a Square units:

4-1/2" Medium square, Dark Quarter Squares Triangles from 5-1/4" squares, and Medium Half Square Triangles:


2-1/2" Medium square, Dark Quarter Square Triangles from 3-1/4" squares, and Light Half Square Triangles:


Use the Dark isosceles triangles and light Half-Rectangles to make 4 units:


Then combine two of them to create a long unit (make 2):


And put it all together:


A straight, horizontal set makes the traditional Storm at Sea quilt:


Or, you can rotate blocks to create an entirely different look:


Try some other rotation combinations--and have fun with a Storm at Sea!

Monday, May 23, 2011

BOW #48 House

There are many house (and Schoolhouse) blocks; this one has curtains at the windows!  There are quite a few pieces, so we'll show how to put pieces together into units, that can then be sewn together into the block (which will finish at 12".)

For this block  you will need the following pieces:
(1) Quarter Square Triangle (made from 7-1/4" square, cut twice diagonally (brown, in the sample)
(5) rectangles, 1-1/2" x 2-1/2" (red)
(4) rectangles 2-1/2" x 7-1/2" (red)
(2) rectangles 2-1/2" x 5-1/2" (background; these are at the very top of the block, around chimney)
(2) 3-1/2" Half Square Triangles (background); (you would have started with 3-7/8" squares)
(1) rectangle 2-1/2" x 3-1/2" (background; this is the door)
(3) 1:1 isosceles triangles, from 2-1/2" strips (background; these are the insides of the windows)
(1) square 2-1/2" (brown; this is the chimney)
(1) 45 degree parallelogram (brown, main part of roof)
(6) Half True Triangles, from 1-3/4" x 3-3/8" rectangles, cut once diagonally (brown; these are the curtains)

Piece in sections, as shown here:


And put the sections together to make the block:


You can set these with a sashing between rows, to simulate roads between the houses--which are very close together, so in an urban setting, I guess!


Or, you can make them suburban, and add vertical sashing to give everyone side yards:


I think this would be fun to do as a scrap quilt, so the houses don't look so much like identical condos but more individual houses.  And, you could make some of the houses with curtains, and some not.