Monday, June 28, 2010
BOW #4: Broken Dishes
One of the first quilted pieces I made was a Broken Dishes--or, at least I thought it was! Broken Dishes is made of a specific arrangement of--you guessed it--half-square triangle units (HSTs). I made the HSTs (with templates--this was before rotary cutters) and arranged each one of them randomly, rather than arranging four of them in the specific pattern. (There is no end to the number of blocks I have creatively edited in this fashion! It's too bad that I didn't know at the time that I was being creative.) I still like it, and it hung over my fireplace for several years.
But the Broken Dishes in the icon quilt is the traditional block arrangement. To make the 12" block you will need 4 HSTs that will finish at 6". (For a 6" block you would use 3" finished HSTs, for an 8" block you would use 4" finished HSTs, etc.) See the first BOW post for methods of making HSTs, or use your own favorite method.
This would look great as a two-fabric quilt, such as blue and white, or red and white. That could be still be scrappy, using a variety of blues or reds. Or, you could make it very scrappy by using a great many light and dark fabrics.
This block is also known as Broken Crockery. For all its simplicity it's wonderful block!
Monday, June 21, 2010
BOW #3: Spool
What could be more "quilt-y" than a spool block? A block with a single spool is typically called simply "Spool" or "Empty Spool" (maybe the empty spool has a skinnier center??), while a block with 4 spools spinning around the central point is "Tumbling Spools."
There are at least 3 ways to make a spool block (and there are variations of that block), but unless you're open to sewing Y-seams, there are two easy methods. I like to do the half-square triangle method. (I don't understand that, actually, because I really don't like making HSTs all that much!) If you use HSTs, the spool is just a nine-patch with HSTs instead of squares for four of the patches.
The Spool block in the icon quilt is a 12" block, made with HSTs. Use your favorite method to make the Half Square Triangles (or go back to BOW #1 post for methods for making them). You will need:
(4) HST units, 3-1/2" with light and dark of your choices
(1) 6-1/2" square dark (or medium, if you want the thread area to be be different, as in the icon block)
(2) 6-1/2" x 3-1/2" rectangles dark
(2) 6-1/2" x 3-1/2" rectangles light
Arrange as shown here, and sew:
You could make a similar block, with different proportions, as a nine patch. You will need:
(4) 4-1/2" HSTs in light and dark of your choice
(1) 4-1/2" square dark
(1) 4-1/2" square light
This is known as "Arkansas Traveler," which has been around under that name since at least the last 19th century. (Various Spool name variations have been around since at least the early 20th century.)
If you make 4 of the spool blocks and arrange them in a pinwheel fashion you create Tumbling Spools, or Spinning Spools. We'll spend more time with that block in a future BOW.
Though this is a wonderful block as it is, there are many options for varying it to make it a little different or to put your own stamp on it. The center of the spool is a square, so you can do whatever you want with that square--just think of it as another block, but smaller. Put a miniature nine-patch in that center, or a pinwheel. Perhaps make a Spinning Spools with pinwheels in the center of each, to make a double pinwheel effect.
Piece the center block with strings (uneven strips of fabric) to give it a scrappy look--and it will even look like thread on the spool! Or piece the center block with a striped fabric to give the effect of thread on the spool, as in this block (nine-patch variation of Empty Spool It looks to as if it's almost empty, but for a few red threads.)
There are at least 3 ways to make a spool block (and there are variations of that block), but unless you're open to sewing Y-seams, there are two easy methods. I like to do the half-square triangle method. (I don't understand that, actually, because I really don't like making HSTs all that much!) If you use HSTs, the spool is just a nine-patch with HSTs instead of squares for four of the patches.
The Spool block in the icon quilt is a 12" block, made with HSTs. Use your favorite method to make the Half Square Triangles (or go back to BOW #1 post for methods for making them). You will need:
(4) HST units, 3-1/2" with light and dark of your choices
(1) 6-1/2" square dark (or medium, if you want the thread area to be be different, as in the icon block)
(2) 6-1/2" x 3-1/2" rectangles dark
(2) 6-1/2" x 3-1/2" rectangles light
Arrange as shown here, and sew:
You could make a similar block, with different proportions, as a nine patch. You will need:
(4) 4-1/2" HSTs in light and dark of your choice
(1) 4-1/2" square dark
(1) 4-1/2" square light
You could also make a variation (of this variation!) from 3 strips 4-1/2" x 12-1/2"(one dark and two lights) and 4 dark squares, 4-1/2". Place background squares at each of those strips and sew diagonally fromcorner to corner, creating the same effect as an HST.
This is known as "Arkansas Traveler," which has been around under that name since at least the last 19th century. (Various Spool name variations have been around since at least the early 20th century.)
If you make 4 of the spool blocks and arrange them in a pinwheel fashion you create Tumbling Spools, or Spinning Spools. We'll spend more time with that block in a future BOW.
Though this is a wonderful block as it is, there are many options for varying it to make it a little different or to put your own stamp on it. The center of the spool is a square, so you can do whatever you want with that square--just think of it as another block, but smaller. Put a miniature nine-patch in that center, or a pinwheel. Perhaps make a Spinning Spools with pinwheels in the center of each, to make a double pinwheel effect.
Piece the center block with strings (uneven strips of fabric) to give it a scrappy look--and it will even look like thread on the spool! Or piece the center block with a striped fabric to give the effect of thread on the spool, as in this block (nine-patch variation of Empty Spool It looks to as if it's almost empty, but for a few red threads.)
Friday, June 18, 2010
BlockFab Tip #2: Take a Screenshot
Many iPhone, iPod touch, and iPad users don't realize that you can take a snapshot of the screen at any time, and then email that photo to yourself or someone else. These devices have a built-in screen capture utility that is simple to use. Here's how.
Press and hold the "Home" button followed by pressing the "Sleep/Wake button" once. When the screen flashes and a camera shutter sound plays, release the "Home" button. Locate the screenshot in your iPhone's camera roll or iPod's saved photos or iPad's Save Photos Album, and send the image through email.
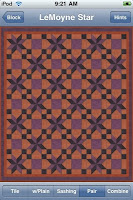
And that's how the screen shots you see on this blog are created. So, as promised, here is a screenshot from BlockFab of this week's block, the LeMoyne Star. It is paired with the Uneven Ninepatch block, in the Halloween colorway, with 25% transparency. Although you can get to this pairing by flicking through the blocks (which are presented in alphabetical order), in a later tip I'll let you in on the secret to getting the pairing you want the first time!
So if you have a screenshot taken in a mobile quilting app, post it on the facebook page, Mobile Quilting Tools by Mary Kay, or email it to BlockFab@podlecki.com and we'll post it for you.
Monday, June 14, 2010
BOW #2 LeMoyne Star
Mary Kay likes the LeMoyne Star, and since we used my favorite block for the first BOW it's only fair to choose her block for #2.
The star, of one sort or another, is one of the favorite motifs of quilters. Sawtooth Star, Ohio Star, Friendship Star, Lone Star, Star of Bethlehem--they all have their own characteristics and charm.
The LeMoyne is an eight-pointed star, usually made with alternating contrasting colors and a background. You can make it with 45-degree parallelograms, as in the Block Fab app, or with half-square triangles (HSTs), (put 2 half-square triangles together and you get a 45-degree parallelogram!), or with 45-degree diamonds. In this post we'll mostly be talking about 45-degree parallelograms/HSTs.
The first medallion center for the BLockFab Icon Quilt was a LeMoyne Star but Mary Kay decided the Bear Paw would be more distinctive. Below are the instructions for that original 36" inch LeMoyne Star block. It would make a nice wall hanging on its own, or border it with other blocks or HST units or plain borders--use your colors and the borders of your choice to make it your own! (Or, make it your own size: Divide the desired finished size by 4 and that will tell you the finished size of each HST)
(You can make the half-square triangle units using your favorite method, perhaps one of the methods mentioned in the BOW #1 post last week.)
Cut:
(4) 9-7/8" squares Color 1
(4) 9-7/8" squares Color 2
(4) 9-7/8" squares Background
(4) 9-1/2" squares Background
On the wrong side of the Background squares and the squares of Color 1, draw a diagonal line from corner to a corner with a pencil.
With right sides together, pair the following squares:
(2) Color 1 and Color 2
(2) Color 1 and Background
(2) Color 2 and Background
Sew a scant 1/4" seam on both sides of the drawn diagonal line of each pair of squares. Cut on the drawn line, fold back the darker of the fabric triangles and press open to make a square.
Arrange the background squares and HST units as shown:
(In a later post Mary Kay will show you one of her favorite quilt designs from the app, using the LeMoyne Star.)This Simplicity Star from Kanesville Quilting is a large LeMoyne Star.
The Lone Star/Bethlehem Star is a sort of LeMoyne Star, but made with 45-degree diamonds. The eight large diamonds that make up the points of the star are made from smaller diamonds. Which could be a fractal. Hmmm....
Oh, and BTW: Jean-Baptiste Le Moyne was a French explorer who founded New Orleans.
Monday, June 7, 2010
BOW #1: Bear Paw
A Bear Paw quilt was the first I ever made, and it still is my favorite block. (Well, if I'm perfectly honest I never finished the quilt entirely. I finished the scrapy top--this was before rotary cutters--and started to hand-quilt it, but didn't get it finished. Mom eventually took it apart, saving the part I had quilted and finishing it as a small quilt. I don't know what happened to the rest of the blocks, now that I think about it. Hmm....)
Recently I taught a class on "6 Ways to Do Half-Square Triangles," using a bear paw quilt I designed, "Bears En Pointe." The scrap quilt also uses an alternate chain block (which will appear in a future BOW) in a a diagonal set with a large focus fabric for the setting triangles.
The app uses the traditional method--the one I still most often use--for making the half-square triangle units:
1. Cut light and dark squares
2. Draw a diagonal line on the wrong side of the light square
3. Layer it with a dark square, right sides together
4. Sew a scant quarter inch on either side of the diagonal line
5. Cut on the drawn line
6. Open the fold and press the seam toward the dark triangle
The magic number for HSTs made with this method is 7/8"--cut the squares 7/8" larger than the desired finished size of the HST unit. For example, the bear claws in Bears En Pointe finish at 2" so you would cut the squares 2-7/8"
To be honest I either cut mine a little larger, or sew a bit smaller seam and then square up the units after pressing. I'm very particular about the units being exactly the right size and I'm not an absolutely perfect, preciser sewer and like to have that bit of "wiggle room" to square it up to perfect size.
There are any number of products on the market that are designed to help you create HSTs. I'm not necessarily recommending any of the following; each has advantages and disadvantages, and different people like different methods, and most are readily available at your local quilt shop.
Thangles
Ta-Da Triangles
Easy Angle ruler (tutorial for using Sharon Hultgren's ruler, made by EZQuilting)
Bias Square Triangle ruler
Here are some links about the history of the block:
Is it Duck's Foot in the Mud or Bear's Paw Quilt? (From Womenfolk.com)
More Code Blocks (Underground Railroad Code Myth, from Hart Cottage Quilts)
Saturday, June 5, 2010
BlockFab Tips and Tricks - Info
Along with the Block of the Week, we'll be offering some tips and tricks so you can get the most out of your BlockFab experience. And since this is the introductory, informational entry for this feature, I thought it would be appropriate to offer a quilt layout Info tip.
The other night Karen and I were talking, via Apple's iChat video conference program -- one of our methods of keeping in touch across the miles (1,239.7 miles to be exact, according to Google). Anyway, she was playing around with BlockFab and liked the quilt layout she was looking at, but in describing it she couldn't remember what colorway she was using.
Situation: I'm in quilt layout mode in BlockFab, I like what I've created, but I'm not sure what it is.
Tip: Single Tap the quilt. An informational overlay will appear over the quilt for 3 seconds. It will give the primary quilt block, layout style, secondary block if there is one, the colorway, and any other layout specific information, such as the symmetry name if you are in Tile mode.
Do you have some favorite tips, or a question? Let us know!
Thursday, June 3, 2010
Block of the Week is a project growing out of BlockFab iPhone/Touch/iPad quilting app that my sister, Mary Kay Podlecki, has created. (This is her 3rd app--all free; also check out her "QuiltFab" and "QuiltRef" apps.) This third app lets you choose blocks and colorways, put them into a quilt--then page through different orientations, try different colorways and then take a snapshot of the quilts you like to e-mail to yourself. It will also give you fabric requirements and instructions for the blocks. (I may be a bit biased, but I think it would be worth it to buy an iPod Touch, if I didn't already own one, just to get the apps!)
With BOW we're going to go through each of the blocks, show photos of completed blocks, give instructions, perhaps some history of the block. We'd love to hear your comments, suggestions for colorways, whatever. And we'll give you a hint or two about using the features in BlockFab.
Please join us!
With BOW we're going to go through each of the blocks, show photos of completed blocks, give instructions, perhaps some history of the block. We'd love to hear your comments, suggestions for colorways, whatever. And we'll give you a hint or two about using the features in BlockFab.
Please join us!
Subscribe to:
Posts (Atom)