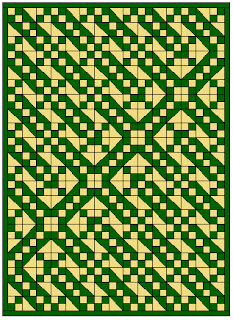
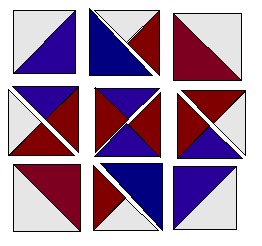
Lady of the Lake is composed of just one, simple unit--the Half Square Triangle, but in 2 sizes.
For a 12" finished block you will need:
(1) 8-/12" HST, light and dark
(18) 2-1/2" HST units, light and dark
Arrange as below.
The diagonal, yin-yang design of this block makes it a perfect candidate for play. You can do all sorts of different arrangements to create completely different looks.
This is perfect for a two-color, white and blue quilt.
Enjoy--and share your own designs!
Monday, February 28, 2011
Tuesday, February 22, 2011
Jacob's Ladder Your Way
Do you like to start with a traditional block, then decide for yourself how big to make that block and how to arrange the blocks to make a quilt uniquely your own?
In the last post, Karen showed some layouts of quilts using the Jacob's Ladder pattern. I thought this would be a good opportunity to see how you can use BlockFab to actually determine how much fabric to buy for the blocks in these quilts, and how to cut that fabric in strips to start constructing the blocks. Then, using the companion app, QuiltFab, you can complete the quilt with borders, binding, and backing.
Looking at Karen's pictures, we see that all three layouts are 5 blocks wide and 7 blocks high for a total of 35 blocks: only the rotation of the blocks differ. If we make the blocks 12 inches by 12 inches and add a small border, this makes a nice twin size quilt. BlockFab also tells us this block is based on a 6 x 6 grid, so 12 inches finished size is a good choice.
Using BlackFab (in this case on the iPad), choose the Jacob's Ladder block from the library, and set the number and size of blocks. (While you're at it, you may want to choose a colorway you like for a better preview of how your quilt will look.) Then you can see how much fabric is needed, and how wide to cut the strips:

If you'd like a refresher on how to cut those strips into individual patches, tap on the individual cutting assumptions:
Then, if you really want to complete the quilt, use the companion app, QuiltFab, to see how much fabric is needed for a border, backing, and binding. Here is the resulting email sent from QuiltFab:
Fabric for 60" by 84" quilt (before borders).
Fabric is 40" wide and shrinks 3%, with 2" added to the length requirements for straightening the ends.
Lengthwise Backing: 5 5/8 yards fabric, 4" overhang, final length may be pieced.
Binding: 3/4 yard fabric (cut width 2 1/2")
Borders are mitered and may be pieced.
Border of finished width 2": 3/4 yard fabric.
Thank you for using QuiltFab!
And that's it! Now you can design quilts the way you want them!
In the last post, Karen showed some layouts of quilts using the Jacob's Ladder pattern. I thought this would be a good opportunity to see how you can use BlockFab to actually determine how much fabric to buy for the blocks in these quilts, and how to cut that fabric in strips to start constructing the blocks. Then, using the companion app, QuiltFab, you can complete the quilt with borders, binding, and backing.
Looking at Karen's pictures, we see that all three layouts are 5 blocks wide and 7 blocks high for a total of 35 blocks: only the rotation of the blocks differ. If we make the blocks 12 inches by 12 inches and add a small border, this makes a nice twin size quilt. BlockFab also tells us this block is based on a 6 x 6 grid, so 12 inches finished size is a good choice.
Using BlackFab (in this case on the iPad), choose the Jacob's Ladder block from the library, and set the number and size of blocks. (While you're at it, you may want to choose a colorway you like for a better preview of how your quilt will look.) Then you can see how much fabric is needed, and how wide to cut the strips:

If you'd like a refresher on how to cut those strips into individual patches, tap on the individual cutting assumptions:
Then, if you really want to complete the quilt, use the companion app, QuiltFab, to see how much fabric is needed for a border, backing, and binding. Here is the resulting email sent from QuiltFab:
Fabric for 60" by 84" quilt (before borders).
Fabric is 40" wide and shrinks 3%, with 2" added to the length requirements for straightening the ends.
Lengthwise Backing: 5 5/8 yards fabric, 4" overhang, final length may be pieced.
Binding: 3/4 yard fabric (cut width 2 1/2")
Borders are mitered and may be pieced.
Border of finished width 2": 3/4 yard fabric.
Thank you for using QuiltFab!
And that's it! Now you can design quilts the way you want them!
Monday, February 21, 2011
BOW #36: Jacob's Ladder
Jacob's Ladder is constructed with just 2 types of simple units that we already know how to make: four-patches and our favorite, half-square triangles.
To make a 12" finished block you will need:
(5) 4-1/2" four patches, light and dark (You'll make the patches from 2-1/2" squares)
(4) 4-1/2" half square triangle units, light and dark
Arrange them into a nine-patch grid, as shown below:
To make a 12" finished block you will need:
(5) 4-1/2" four patches, light and dark (You'll make the patches from 2-1/2" squares)
(4) 4-1/2" half square triangle units, light and dark
Arrange them into a nine-patch grid, as shown below:
Jacob's Ladder is another one of those blocks that can create MANY different looks, depending on how you turn the blocks. It's fun to play with! Here are a few arrangements:
Monday, February 14, 2011
BOW #35: Card Trick
Card Trick is one of the first blocks I made but, as I recall (this was more than 30 years ago...) I did it the hard way, with some inset seams. Let's not do that. :-) This is a fun block, in either the 2 colors you see in the sample, or in 4 colors, if you feel adventurous!
It makes use of two types of blocks or segments that we have visited before: the ubiquitous HST (Half Square Triangle) and the QST (Quarter Square Triangle. ) If you want to review the instructions for making either: HST QST
For each 12" finished block (with 2 colors of cards) you will need the following (each unit should be 4-1/2"):
Make 2 of each:
And then arrange them as here; be careful; it's "tricky;" you have to be certain you have those QSTs placed and oriented correctly!
I have no idea where that old Card Trick block is, but I think Mary Kay may have one??

MK: Card Trick is one of my all-time favorite blocks, so you'd think I'd have a quilt using it! But I guess I'm still at the dreaming phase, like this one paired with the 7-Grid Chain block.
Perhaps one of you can help us out by posting one of your quilts!
It makes use of two types of blocks or segments that we have visited before: the ubiquitous HST (Half Square Triangle) and the QST (Quarter Square Triangle. ) If you want to review the instructions for making either: HST QST
For each 12" finished block (with 2 colors of cards) you will need the following (each unit should be 4-1/2"):
Make 2 of each:
Make 3 of each:
And then arrange them as here; be careful; it's "tricky;" you have to be certain you have those QSTs placed and oriented correctly!
I have no idea where that old Card Trick block is, but I think Mary Kay may have one??

MK: Card Trick is one of my all-time favorite blocks, so you'd think I'd have a quilt using it! But I guess I'm still at the dreaming phase, like this one paired with the 7-Grid Chain block.
Perhaps one of you can help us out by posting one of your quilts!
Monday, February 7, 2011
BOW #34 Sailboat
We're back with blocks, after a week off while I was away from my computer. This week's block is the sailboat. Many quilt blocks' names are, well, something of a stretch to imagine the origin of them. But some blocks are clearly and appropriately named, and this week's, Sailboat, is one of those; it's a great block for kids' quilts.
The block might look a little daunting, but if we break it down into pieces, it's not bad at all. And it uses techniques that we've already used in previous blocks.
For a 12" finished block, you'll need:
(4) 3-1/2" HSTs (half-square triangle units), half white and half light blue
(2) 3-1/2" x 6-1/2" rectangles in light blue
(1) 3-1/2" x 12-1/2" red rectangle
(2) 3-1/2" squares, light blue
(1) 3-1/2" x 12-1/2" rectangle, dark blue
With right sides together, place a light blue 3-1/2" square on opposite ends of the 3-1/2" x 12-1/2" red rectangle, and sew diagonally across the blue squares, as shown. (This is the same technique we've used to make flying geese, but the base rectangle is longer.)
Trim the triangles, leaving approximately 1/4" seam allowance. Fold back the blue triangles, to make the hull of the boat:
Now arrange all the pieces as shown:
Last week Mary Kay explained the grid system, and this block could have been made strictly on a grid--a 4x4 grid. If we did it that way, we would have just divided the block into that grid, and pieced it with all square units: 16 of them. (Can you see where you would have used, in addition to the 4 blue-and-white HSTs: 4 light blue squares, 4 dark blue squares, 2 red squares, and 2 HSTs that are half red and half light blue?)
Here's an idea for a kids' quilt: make 2 of these blocks, and put them in opposite corners of a 2x2 grid. In the other 2 blocks, make blocks with the signal flags or the child's initials. Put on a couple of borders, and you have a personalized quilt for your favorite child.
Subscribe to:
Comments (Atom)


